Search This Blog

Showing posts with label Oracle. Show all posts

Friday, 3 January 2014

All Oracle Certification Dumps

Hi All,

If you are trying to write any oracle related certifications and looking for dumps, Let me know. I know some peoples online who gives dumps in very low rate.

Cheers!
Bose

Monday, 9 September 2013

Step by Step Installation of Oracle 11g 64bit in Windows7 64bit

This Post will give you step by step information of Oracle database 11g 64 bit version installation in windows 7 64 machine. If you prefer with Oracle Database 11g installation in Windows 64bit machine, This post will help you to move forward.

Prerequisites Checks:
Requirement Minimum Value
Physical memory (RAM) 1 GB minimum
On Windows 7 and Windows 8, 2 GB minimum
Virtual memory
  • If physical memory is between 2 GB and 16 GB, then set virtual memory to 1 times the size of the RAM
  • If physical memory is more than 16 GB, then set virtual memory to 16 GB
Disk space Total: 5.39 GB
Processor Type AMD64, or Intel Extended memory (EM64T)
Video adapter 256 colors
Screen Resolution 1024 X 768 minimum

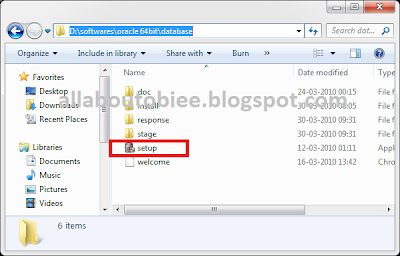
Download oracle Database from oracle site and unarchive the zipped download file.

Step1: 
Just double click on setup.exe from the unarchived folder of oracle database source.
Step2:
Oracle Universal Installer will check the disk space and initiates the installation
Step3:
If you have a oracle metalink ID then type your email and oracle support password in the provided space with the below screen. Otherwise uncheck the 'I wish to receive security updates via My Oracle Support' option.
Once we unchecked the option with the above screen we will get a popup like below screen. just Click 'Yes' with this popup window and Click 'Next' with above screen
Step4:
If we are installing oracle database in our machine first time then go ahead with first option 'Create and Configure a database' with the below screen. If not, select appropriate option which you want and then click 'Next'
Step5:
Select 'Server Class' to install of full feature of oracle database 11g 64 bit and click 'Next' with below screen
Step6:
As we are not going to install in cluster database, select 'Single Instance database installation' and then click 'Next' with the below screen
Step7:
Select 'Typical Install' and then click 'Next'
Step8:
It will automatically select drive and folder to install database. If you want to change the installation folder you can browse the custom folder you have been created
This screen will ask some more details:
Global Database Name: ORCL (if we want to change it we could name which we want)
Type administrator password and keep remember the password. because this password will help us to login into database with the user sys and system.

and then click 'Next'
Step9:
This steps checks all the prerequisites such as disk space, memory, environmental variable and so on, so once it is done we will get next screen automatically
Step10: 
This summary steps gives us the option 'Save Response File' to store all installation related folder information in a text file.
Just click 'Finish' with this step to initiate the product installation
Step11:
The next few screen will show the progress of oracle database installation such as installation preparation, copying folder to the target folder and setup files

At any of of point if windows security comes like below screen just click 'Allow Access' to continue the installation

After the automatic file copy and configuration it will start creating and configuring some of the default database schema and users automatically
In Database configuration Assistant select 'Password Management'
uncheck 'Lock Account?' column for the users to you want unlock and set the  password. Here I have unlocked the users HR, SH and OE will help us in future to do some sample work with OBIEE and then click 'OK' with the below and above screen.
Step12:
with above steps the installation  and configuration comes to end. So Just click 'Close' with the below screen to complete the installation.

Happy Blogging!!!
Bose

Thursday, 5 September 2013

ORACLE BASIC Developer & DBA COMMANDS

After DB installation Ensure the following services are running.
1. Oracle service<Instance Name>
2. Oracle listener service

Goto sqlplus enter userid/pwd or userid/pwd@service_name
If the username and pwd is correct, we would be logged into the oracle and will get the SQL Prompt
SQL>

To Create Table Space:
Create a folder in local drive like BOSE_DBF
SQL> CREATE TABLESPACE KK DATAFILE 'E:\BOSE_DBF\BOSE.DBF' SIZE 50M;
Tablespace created.

To Increase the Tablespace Size:
• Increasing the Existing Datafile

SQL> ALTER DATABASE DATAFILE 'E:\BOSE_DBF\BOSE.DBF' RESIZE 100M;
Database altered.

Appending additional DATA file to the Tablespace

SQL> alter tablespace kk add datafile 'e:\bose_dbf\bose1.dbf' size 20M;
Tablespace altered.


To create DB user:
SQL> create user <username> identified by <password> default tablespace <Tablespace Name>
Temporary tablespace <Temporary tablespace name>;

SQL> create user bose identified by bose default tablespace bose temporary tablespace temp;
User created.


SQL> show user;
USER is "SYS"

Granting Access to the USER:
SQL> grant create session,imp_full_database to <user name>
SQL> grant create session,imp_full_database to bose;
Grant succeeded.

Granting DBA Access to the USER:
SQL> grant dba to user
SQL> grant dba to bose;
Grant Succeeded

Altering USER:
SQL> alter user bose quota unlimited on <username>;
SQL> alter user bose quota unlimited on bose;
User altered.

Now we will exit from the sys user and will connect our newly created to user to import or export the db objects

SQL>conn bose/bose

Syntax for Import:
• C:\>imp <username>/<password> file=<dumpname.dmp> log=<logfilename.log> full=y
C:\>imp bose/bose file=bose.dmp log=boseimp.log full=y

• C:\>imp <username>/<password> file=<dumpname.dmp> log=<logfilename.log> fromuser=<fromusername> touser=<tousername>

• Before import we need to check the tablespace free space.
SYSTEM -200M
INDX -100M
DEFAULT TABLESPACE (BOSE) 

C:\>imp bose/bose file=bose.dmp log=boseimp.log fromuser=hr touser=bose
Import completed successfully with warnings.

After Import Connect to the Respective DB user
C:\>sqlplus

Enter username: bose/bose

SQL>@c:\compile – it will compile all the Invalid objects run the compile script atlease 4 times.

Exporting DB user:
Syntax:
C:\> exp <username>/<password> file=<filename.dmp> log=<logname.log>
C:\>exp bose/bose file=bose.dmp log=kk.log
.
.
Export terminated successfully without warnings.

Taking full DB Export:
 C:\>exp system/<system pwd> file=<filename.dmp log=logfile.log full=y
C :\> exp system/system file=fulldump.dmp log=fulldump.log full=y

To drop DB user:
SQL> drop user kk cascade;
              User dropped.

To drop DB user object:
Connect to specified Database
SQL> CONN bose/bose
SQL> SHOW USER
BOSE
SQL>@C:\drop.sql
To Drop Tablespace:
SQL> drop tablespace bose including contents;
Tablespace dropped.

SQL> select username from dba_users:
It will display all the username in the DB

SQL> select name from v$database;
NAME
ORCL
It will display the DB name

SQL> select count(*) from user_objects;
           It will display the number of objects in that schema.

Cheers!
Bose

Sunday, 1 September 2013

Step by Step installation of Oracle Client in Windows 7

I am giving here the complete step by step installation of  Oracle Client 32bit installation in Windows7 64 bit machine environment. If you are planning to install oracle client in windows machine this post will help you install completely.

Step 1: 
Download oracle client software from oracle site and unarchive the zip file and click on setup.exe from the unarchived client folder

Step 2: 
Oracle Universal Installer starts to initiate the installation with the below screen
Step 3:
Actually from here actual only actual installation steps begins. Select the type as per your needs. Here I am having the master database installed in another machine in the network so going with 'Administrator' installation to have a complete installation and features of Oracle Client
Step 4:
Select the languages support you need to be have with this installation. Here I have selected all the languages.
Step 5: 
This step is an important step in Oracle Client Installation. If you are having database installed already in the machine and if you are installing oracle Client also on the same machine then It will select the same path where database is installed automatically.

I suggest always to create a separate folder and Install it in separate place to differentiate database and client easily.
Step 6:
once you clicked with 'Next' button with above screen, we will get the below screen. With this screen we have the button 'Save Response File' to save the installation details in a file and then Click 'Finish'
Step 7:
Once we clicked 'Finish' with above screen installation of client starts and It takes a while to install all the necessary files and details in folder.
Step 8:
After successful completion of installation we will be getting below screen. Just click 'Close' to complete installation.

Happy Blogging!!!
Bose

Sunday, 16 December 2012

SQL Query for Top 10 Product Sales


Here is the Oracle Query to find the Top 5 Products sales amounts from the table

Synopsis:

SELECT * FROM
(
  SELECT PROD_ID, SUM(AMOUNT_SOLD) AS "AMOUNT SOLD"
    FROM SALES
GROUP BY PROD_ID
ORDER BY SUM(AMOUNT_SOLD) DESC
       , PROD_ID ASC
) A
WHERE rownum <= 10;

Cheers!!!
Bose

Saturday, 15 December 2012

Oracle / SQL Server Query for MTD (Month to Date), YTD (Year to Date), Rolling 12 Months, & Prior Year Sales

Recently I came across an interview and I had been asked for write an SQL Query from the table for Month To Date and Year To Date for sales amount from sales table.

Here is the synopsis:
If using Oracle use the trunc and numtoyminterval functions; if using SQL Server use the datediff function.
 
Oracle Month to Date:


SELECT sum(SALES_AMOUNT)
FROM SALES
WHERE DATEOFSALES BETWEEN trunc(sysdate, 'MONTH') and sysdate

Oracle Year to Date:


SELECT sum(SALES_AMOUNT)
FROM SALES
WHERE DATEOFSALES BETWEEN trunc(sysdate, 'YEAR') and sysdate

 
Oracle Rolling 12 Months:


select sum(SALES_AMOUNT)
FROM SALES
WHERE DATEOFSALES between trunc(sysdate - numtoyminterval(12, 'MONTH'),
 'MONTH') and sysdate

 
Oracle Prior Year:


SELECT sum(SALES_AMOUNT)
FROM SALES
WHERE trunc(DATEOFSALES, 'YEAR') = trunc(sysdate - numtoyminterval
(1, 'YEAR'), 'YEAR')

SQL Server Month to Date:


SELECT sum(SALES_AMOUNT)
FROM SALES
WHERE datediff(month, DATEOFSALES, getdate()) = 0
AND DATEOFSALES <= getdate()

 
SQL Server Year to Date:


SELECT sum(SALES_AMOUNT)
FROM SALES
WHERE datediff(year, DATEOFSALES, getdate()) = 0
AND DATEOFSALES <= getdate()

 
SQL Server Rolling 12 Months:


SELECT sum(SALES_AMOUNT)
FROM SALES
WHERE datediff(month, DATEOFSALES, getdate()) <= 12
AND DATEOFSALES <= getdate()

 
SQL Server Prior Year:


SELECT sum(SALES_AMOUNT)
FROM SALES
WHERE datediff(year, DATEOFSALES, getdate()) = 1


Hope it is useful.
Cheers!!!
Bose


Thursday, 8 March 2012

Unlocking and Changing the password of Oracle Account


Login with the credential of sys or system User or with any other Account who is having oracle DBA rights. Once we logged in with the oracle DBA User, type the below comment to unlock the account.


SQL>ALTER USER USERNAME ACCOUNT UNLOCK;


e.g SQL> alter user HR account unlock;


We will get the message 'account altered' once we executed the above command.


Once you unlocked the user you can login with the user if you have password of the unlocked user name. If suppose you forgot the password or do not the know password,
use the below comment to change the password.


SQL>ALTER USER USERNAME IDENTIFIED BY PASSWORD;
e.g SQL> alter user HR identified by HR;
Now you can login with the username and pasword by using below comments.


SQL>CONNECT USERNAME/PASSWORD@SID
(or)
SQL>CONN USERNAME/PASSOWRD@SID


e.g SQL> conn HR/HR@ORCL


Hope it is useful.


Cheers!
Bose

What is Oracle Database Link and How to create database link (DB Link)

 https://www.oracletutorial.com/oracle-administration/oracle-create-database-link/

Recent Posts