Search This Blog

Wednesday 14 August 2019

Automated Cache purging in OBIEE 12c

In this post We are going to create a shell script which will purge all the cache in OBIEE. This file could  be scheduled in a cronjob OR added in informatica or ODI to run everyday once all the loads are completed or Run manually whenever you would like to run.

Step1: Create purgecache.txt file like below

Purgecache.txt

call SAPurgeAllcache()

Step2: Create a shell script to call the above file and clear the purge.

****************************************************************************************

#purgeCache12c file is created for clearing BI 12c cache#

#File Name - purgecache.sh

#!/bin/bash

#OBIEE12c Home Location

export MW_HOME=/OBIEE12c

#Location of the Purgecache script file

export SCRIPT_PATH=/OBIEE12c/scripts/purgeCache

# Timestamp for Log file creation

TIME_STAMP=`date '+%Y%m%d_%H%M'`

#Log File directory and filename creation

export LOG_FILE=$SCRIPT_PATH/purgecache_${TIME_STAMP}.log

#Mail Group that you want to send (Optional)

MAIL_LIST="#bisupport@oracle.com"

#Command to clear BI Server Cache

$MW_HOME/user_projects/domains/bi/bitools/bin/nqcmd.sh -d AnalyticsWeb -u weblogic -p weblogicpwd -s $SCRIPT_PATH/purgecache.txt -o $LOG_FILE;

# Finding Purge cache Line Count for Cache Clear success or Fail

line_cnt=`cat $SCRIPT_PATH/purgecache.txt|wc -l`

SUCCESS_FLG=`grep -E 'Operation SAPurgeAllCache succeeded' $LOG_FILE|wc -l`;

if [ $SUCCESS_FLG = $line_cnt ]

then

        echo "Cache Cleared Successfully " >> $LOG_FILE

        echo `hostname` >> $LOG_FILE

        mailx -s "Cache Clearance Successful on `hostname`" $MAIL_LIST < $LOG_FILE

else

        echo "Cache clearance Failed" >> $LOG_FILE

        mailx -s "Cache Clearance Failed on `hostname`" $MAIL_LIST << EOT

        GCWUAT Cache clearance Failed, please verify

EOT

fi

#Command to Delete the log files which is older than 5 days

find $SCRIPT_PATH/ -name "*.log" -type f -mtime +2 -exec rm -rf {} \;

**************************************************************************************

Note:

MW_HOME environment variable value should be updated based on you BI 12c environment.

You can test this script file by running manually once in your environment by the below command.

./purgecache.sh


Happy Blogging!

Bose

Thursday 14 February 2019

How to download Oracle Software directly in Servers using wget.sh file | How to download using wget.sh file

I often wonder that how do we download GB size of oracle softwares and move it server and Install the same until I get to know how simple is that downloading any size of software using wget.sh shell script file directly in server.

Steps are very Simple. But as a first thing, Create/Have an Oracle account for You!

Step1:

Either Oracle eDelivery or Support.oracle.com, get the wget.sh file for the software that you would like to download


Download .sh and move the file to server where you want to download.

Step2:
Open shell scripts or command prompt just run the below command

[$] ./wget.sh
enter your username: bose.obiee@gmail.com + enter
[type your password] + enter

Note:
i. Enter the same username and password which you used to download the software
ii. After entering the username, just enter it 
iii. Second line will be blank but enter the oracle account password and click enter
iv. Check if you have proper privileges with read+write+execute permission in the target directory             when you are downloading.

If it is a bigger a software then it would take sometime based on the network speed in server and will complete the download.

Happy Blogging!
Bose

Saturday 26 January 2019

OBIEE 12c Lift and Shift

When we are doing the lift and shift of OBIEE 12c, We would be copying the entire OBIEE 12c installed directory to the new server. 

When we are doing this change, We have to complete prerequisite check first and then we have to update the hostname and IP Address of the new server in the following locations in OBIEE 12c files.

Following are the file locations and file names for two Node clustered Servers:

Node1

Update the IP address in startup.properties file in the following locations.

/OBIEE12C/user_projects/domains/bi/servers/bi_server1/data/nodemanager

/OBIEE12C/user_projects/domains/bi/servers/bi_server3/data/nodemanager

/OBIEE12C/user_projects/domains/bi/servers/bi_server5/data/nodemanager

/OBIEE12C/user_projects/domains/bi/system_components/OBICCS/obiccs1/data/nodemanager

/OBIEE12C/user_projects/domains/bi/system_components/OBIJH/obijh1/data/nodemanager

/OBIEE12C/user_projects/domains/bi/system_components/OBIPS/obips1/data/nodemanager

/OBIEE12C/user_projects/domains/bi/system_components/OBISCH/obisch1/data/nodemanager

/OBIEE12C/user_projects/domains/bi/system_components/OBIS/obis1/data/nodemanager

Update IP address of the new server in nodemanager.properties file in below location

/OBIEE12C/user_projects/domains/bi/nodemanager

Update IP address of the new server in  config.xml file in below location

/OBIEE12C/user_projects/domains/bi/config

Update IP address of the new server in admin.conf  file in below location

/OBIEE12C/user_projects/domains/ohs/config/fmwconfig/components/OHS/instances/ohs1

Update IP address of the new server in wsm-ccw-config.xml file in below location

/OBIEE12C/user_projects/domains/bi/config/fmwconfig


Node2:

Update the IP address in startup.properties file in the following locations.

/OBIEE12C/user_projects/domains/bi/servers/bi_server2/data/nodemanager

/OBIEE12C/user_projects/domains/bi/servers/bi_server4/data/nodemanager

/OBIEE12C/user_projects/domains/bi/servers/bi_server6/data/nodemanager

/OBIEE12C/user_projects/domains/bi/system_components/OBICCS/obiccs2/data/nodemanager

/OBIEE12C/user_projects/domains/bi/system_components/OBIJH/obijh2/data/nodemanager

/OBIEE12C/user_projects/domains/bi/system_components/OBIPS/obips2/data/nodemanager

/OBIEE12C/user_projects/domains/bi/system_components/OBISCH/obisch2/data/nodemanager

/OBIEE12C/user_projects/domains/bi/system_components/OBIS/obis2/data/nodemanager

Update the IP address in nodemanager.properties file in the following location.

/OBIEE12C/user_projects/domains/bi/nodemanager

Update the IP address in config.xml file in the following location.

/OBIEE12C/user_projects/domains/bi/config

Update the IP address in  admin.conf file in the following location.

/OBIEE12C/user_projects/domains/ohs/config/fmwconfig/components/OHS/instances/ohs2

Update the IP address in wsm-ccw-config.xml file in the following location.

/OBIEE12C/user_projects/domains/bi/config/fmwconfig


Cheers!
Bose

Wednesday 23 January 2019

OBIEE 12c BIPLATFORM / MDS Account Password Expired or Account locked

I have recently come across an issue where few of our BI components went down and while stopping/restarting the services, It prompts for weblogic User Name and Password and also failing to start the services.

I have started analyzing the AdminServer log files in OBIEE 12c where I found the issue details like

[jdbc:oracle:thin:@//biapp:1521/bidev]

caused by java.sql.SQLException: ORA-28001: the password expired.

Then I understand that the supporting schemas like MDS, BIPLATFORM, IAU, OPSS and etc., accounts are expired in database. Here is the steps that how I have resolved that.

Step1: Connect to oracle database as a sys user and run the below query to get the expired accounts.

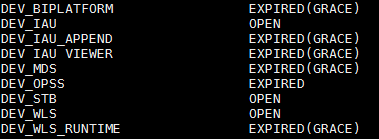
SQL> SELECT USERNAME,ACCOUNT_STATUS FROM DBA_USERS WHERE ACCOUNT_STATUS LIKE 'EXPIRED%';

Above query will result all the expired account details.

OR

SQL> SELECT USERNAME,ACCOUNT_STATUS FROM DBA_USERS WHERE USERNAME LIKE 'DEV_%'

Above query will result all the accounts starting with the name 'DEV_'


If you see the above screenshot, 6 accounts are expired. Lets start fixing it.

Step2: First we have to get the existing password for the expired accounts. For that run below query.

SQL> SELECT USERNAME, PASSWORD FROM DBA_USERS WHERE USERNAME = 'DEV_BIPLATFORM';

This query will give the password for only DEV_BIPLATFORM account. same like, get the password for all the accounts.

Step3: Reset the password for the account

SQL> ALTER USER DEV_BIPLATFORM IDENTIFIED BY 'Admin123';

Step4: (Optional: If any account is locked)

SQL> ALTER USER DEV_BIPLATFORM ACCOUNT UNLOCK;

Step5: Disable Password expiry

SQL> ALTER PROFILE DEFAULT LIMIT PASSWORD_LIFE_TIME UNLIMITED;

Note:

If you need to know the Profile name , then Please run the below Query:

SYNTAX: 
SELECT PROFILE FROM DBA_USERS WHERE USERNAME = '<USERNAME>';
E.G: 
SELECT PROFILE FROM DBA_USERS WHERE USERNAME = 'DEV_BIPLATFORM';

What is Oracle Database Link and How to create database link (DB Link)

 https://www.oracletutorial.com/oracle-administration/oracle-create-database-link/

Recent Posts