Surprisingly Oracle has released OAS for windows and I gave a try to install OAS 5.5 in windows to check out the look and features. This post has the steps how I have installed OAS 5.5 in windows.
Prerequisite:
1. Java JDK1.8 221 or Above. (Step by Step installation of Java)
2. Oracle Database 11g Release 2 and above. (Step by step Installation of Oracle DB 12c)
3. I would highly recommend to have minimum of 16 GB Memory and 50GB Disk Space to Install in your windows machine.
OAS 5.5 has 4 Major stages of Installation in Windows
1. Oracle Fusion Middleware Installation
2. OAS Platform Installation
3. RCU (Repository Creation Utility)
4. OAS Configuration
Note: Interim FMW Patch is only for Linux and not required for Windows.
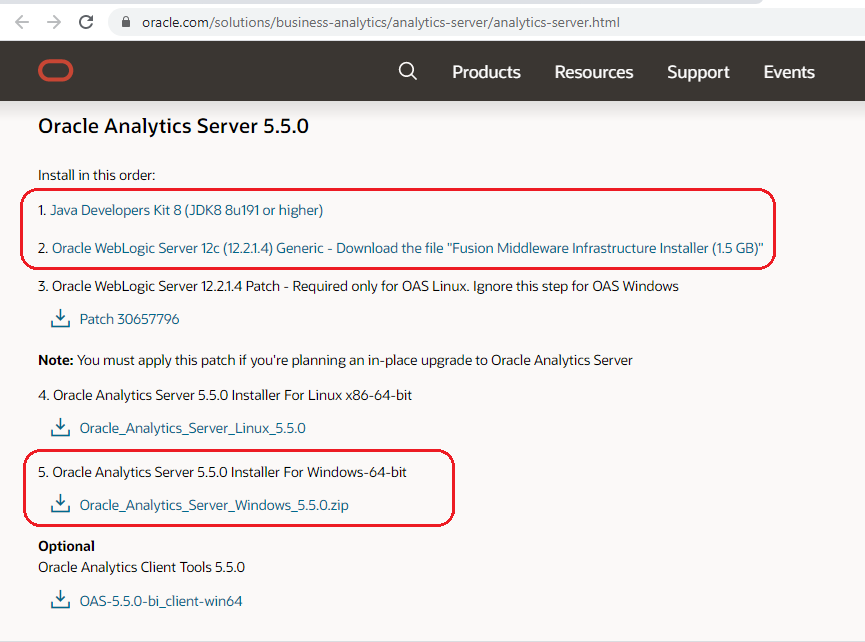
Download the OAS 5.5 software's files and extract it in a folder.
Download Link:
https://www.oracle.com/solutions/business-analytics/analytics-server/analytics-server.html
Check if JAVA_HOME and ORACLE_HOME variable are set in Environment variable. If it is not set, then Create the environment variable.
example:
JAVA_HOME=C:\Program Files\Java\jre1.8.0_271
ORACLE_HOME=C:\oracle\app\oracle\product\11.2.0\db_1
Step1: Oracle Fusion Middleware Installation
Open the Command Prompt with 'Run as administrator' and go to JAVA bin location to start the fusion middleware installation. The whole OAS installation going to be done in command prompt with the same manner.
cd C:\Program Files\Java\jre1.8.0_271\bin
C:\Program Files\Java\jre1.8.0_271\bin> java -jar D:\OAS\fmw_12.2.1.4.0_infrastructure.jar
It will check the prerequisite and starts the installation. Just click 'Next' with the below screen.
Select the installation directory where you want to install OAS.
Just keep the default selection 'Fusion Middleware Infrastructure' and Click 'Next'
Now the installer checks the system certification and java version. Just click 'Next'
With this step, I have saved the response file for silent installation. If you don't want, then just click 'Install' to start the installation of OAS FMW.
Just click 'Install'.Save response file if you would like to use it later for silent installation in another environment.
OAS FMW installation is in progress....
If all the steps are successful, it will complete with 100%. Just click 'Next' Here
We have come to the last step of OAS FMW installation. Just click 'Finish' the complete the installation.
2. OAS Platform Installation
Go to Java bin directory and execute the OAS Platform JAR file with the below command from command prompt.
cd C:\Program Files\Java\jdk1.8.0_271\bin
C:\Program Files\Java\jdk1.8.0_271\bin> java -jar D:\OAS\oa_platform-5.5.0.0.0-20200829051051-win64.jar
It will take a while as the jar file is huge and will start the install window.
Just Click 'Next' with the first step
Leave with default selection 'Skip Auto Updates' and click 'Next'
In this step, select your Oracle Home from your fusion middleware directory and click 'Next'. Here I created my own directory OAS55 in D drive and selected that directory.
It will check the prerequisite. Just click 'Next'
With the below step, Save response file if you would like to use it for silent installation in any other system. otherwise just click 'Install'
Installation is in progress......
If it prompts for MS Visual package, just click Allow and close once it is completed.OAS Platform installation is completed successfully with 100%. Click 'Next'
Click 'Finish' with the last step to complete the installation.
Command prompt window after OA Platform installation.
4. RCU (Repository Creation Utility)
Go to the OAS Middleware common bin directory bi\bin and run command.
cd D:\OAS55\oracle_common\bin
D:\OAS55\oracle_common\bin> rcu.bat
Just click 'Next' with the first stepGo with default selection 'Create Repository' and 'System Load and Product Load' then click 'Next'
Enter all your parameters with step3 below Host Name: Bose
Port: 1521
Service: ORCLPDB
User Name: Sys
Password: Admin123
Role: SYSDBA
Checking RCU Prerequisites. Just click 'OK' once it is done.
We could name prefix of all the RCU accounts. I have select as DEV as a prefix for all my RCU schemas. Don't forget to select 'Oracle Business Intelligence' with the below step
Running Prerequisites for all the schemas. Just click 'OK' once it is done.
Type Password that you would like keep for all your RCU Schemas and click 'Next'
It will show all the schema, tablespace and temp tablespace name that is going to be created. Just click 'Next'
Just click 'OK' with the confirmation window.
Creating Tablespaces. Just click "OK' once it is done.
Step 7 is the actual step where it is going to create all the schemas. Click 'Create' with the below step.
Once we clicked 'Create' with the above step, it will start creating and runs the below window.
Once it is created successfully click 'Close' to complete the RCU Creation.
5. OAS Configuration
In command prompt, Go to fusion middleware bi/bin directory to run the OAS configuration.
cd D:OAS55\bi\bin
D:OAS55\bi\bin>config.cmd
Just click 'Next' with the first step of OAS Configuration.
With the second step, we could keep BI Publisher if we want with our installation otherwise we could uncheck it. I have selected both and clicked 'Next'
It run the system prerequisite check. Just click 'Next'
With the step4, It will select the domain directory by default. If we want to change, we could click 'Browse' and can change the directory. Type the weblogic password and confirm password with this step.
In Step5, select 'Use existing Schemas' as we have already created all the RCU schemas and enter the details. Database Type: Oracle
Simple connection String: Bose:1521:ORCLPDB ( HostName:Port:Service)
Prefix: DEV
Password: Admin123
After all the details entered, click 'Next'
in Step6, It would select the port range. we could change based on our criteria. I just left with the default port selection and clicked 'Next'
with step7, we could select the first option to install with sample application. I have selected second option since I want clean installation and clicked 'Next'
with Step8, we could save response file for future use. and click 'Configure' to start OAS configuration.
with step9, OAS Configuration will progress. It takes a while to complete the everything. We are good if it is completed 100%
Completed 100% successfully with the configuration. Once it is completed successfully then click 'Next' with the above step to come to last step.
Save the log file with the last step which will have all the analytics, em, console URL and other details then click 'Finish' to complete the OAS Configuration.
Console:
Hurray!!!! We have successfully installed OAS 5.5 in windows with the above step. Check OAS Analytics, EM and all the components and Enjoy :)
Cheers! Bose


Nice.. Able to install OAS in my windows 10 using this steps. Thanks for the post.
ReplyDeleteCan anyone help with Out-of-place migration steps from Obiee 11.1.1.9 to OAS 5.5 ?
ReplyDeleteThat is wonderful, I love this information and I appreciated this blog posting. If you have run an online business then I think this post is too much valuable your you.
ReplyDeleteUSA Dedicated Server
UK Dedicated Server
I think you did an awesome vikram university bsc 3rd year result job explaining it. Sure beats vikram university pg result having to research it on my own. Thanks
ReplyDeleteI really appreciate your help with my project! Haseen Dillruba Full Movie Release Date
ReplyDeleteSex Education Season 3 Release Date
It is very nice article on that topic. I was looking for something like which is interesting and knowledgeable
ReplyDeletethanks for your helpful instruction. and we want more.
ReplyDeletewonderful Information..
ReplyDeleteThe blog has been written in a manner that there isn't anything that has been left revealed, and furthermore, I have perused different web journals that are posted here and they are altogether worth a read.
ReplyDeletevisit site
The blog has been written in a manner that there isn't anything that has been left revealed, and furthermore, I have perused different web journals that are posted here and they are altogether worth a read.
ReplyDeletebellen bellen
Very informative blog. Thanks for sharing the information.
ReplyDeleteCopper Slag Manufacturer in Chennai
Hi, Great Post. Very informative... Could succeed in installing OAS
ReplyDeleteThanks for sharing this with us...…this is really appreciating.
ReplyDeleteBSc 1st Year Time Table 2021
BSc 2nd Year Time Table 2021
BSc 3rd Year Time Table 2021
Import Globals is one of the leading import export data provider for Pakistan, Turkey, Russia, Ukraine. For more information visit our website.
ReplyDeleteTurkey Import Data
This comment has been removed by a blog administrator.
ReplyDeleteThis comment has been removed by the author.
ReplyDeleteThis comment has been removed by the author.
ReplyDeleteThank you so much for sharing such an amazing information with us. Visit for GeM Helpdesk Helpline, Tender Services, OEM Panel on GeM, and Tender Consultancy in Delhi NCR. Visit our website for more information in details.
ReplyDeleteOEM Panel on GeM
Amazing information. Get the best Home Nursing Services in Delhi NCR for Suturing Removal at Home, RT Insertion at Home, and Elderly Care at Home. For more information visit Orange Pill Clinic.
ReplyDeleteNursing Services for Elderly Care at Home
This comment has been removed by the author.
ReplyDeleteUK dedicated servers are a great option for businesses that need reliable performance, strong security, and low-latency connectivity across Europe. With dedicated resources, full control, and scalable infrastructure, UK server hosting is ideal for websites, applications, eCommerce platforms, and enterprise workloads.
ReplyDelete