Introduction:
In this Post we will know how to create the sample Data Model with the DSN 'OE' which we have created in Data Sources in the previous post Create Data SourceIn release of OBIEE 11g, Oracle BI Publisher introduces the Data Model Editor, a graphical user interface for building data models within the BI Publisher interface. It enables us to perform the following tasks:
- Create Data Sets - Access data from a wide range of sources: RDBMS, OLAP, WebServices, BI Analyses, XML files, Excel and others.
- Query data - Build SQL or MDX queries to extract data from relational or multidimensional (OLAP) data sources.
- Structure data - Define master-detail relationships between data sets to group data at multiple levels to optimize document generation.
- Aggregate data - Create group level totals and subtotals.
- Customize data - Modify data field names to conform to business terms and reporting requirements.
- Create calculations - Compute data values that are not stored in the underlying data sources that are required for reporting.
- Advanced tasks - Define parameters and lists of values (LOV), triggers, and other advanced elements as required by reports and report users.
Creating Publisher Folder:
Before going to create a new Data Model, Create a your own folder to save your Publisher Related work.
Come to 'Home' Page of BI Publisher and click Catalog' Link and select 'Shared Folder' in the left side of catalog tab. Now Click 'New' under catalog tab and select 'Folder'
Folder 'Create' window open. Create New folder name 'Publisher' click 'Create'
New 'Publisher' folder has been created and shown in the right side of catalog tab.Creating New Data Model:
Step1: There are multiple ways to create a Data Model. Create a Data Model by following any of the below method:
Step2: Once we clicked on the Data Model we will get 'Untitled Data Model' window. Select 'OE' from Default Data Source and Optionally add description if you want to add.
Make sure in the XML Output Options, the Include Parameter Tags is checked, and the Include Empty Tags for Null Elements, and Include Group List Tag check boxes are not checked. Check the below screenshot for your reference:
Step3: Save the Data Model by clicking save button which is available in the right upper corner. I have saved in the folder 'Publisher' which we have created for publisher report purpose in the name of 'sample_Employee_DM'.
Step4: After saved the Data Model is displaying with the name sample_Employee_DM instead of Untitled Data Model. Now we have set all the properties of the Data Model.
Click on 'Data Sets' which is available below Data Model in the left pane. Once we selected Data Sets, the right pane will show three tabs such as Diagram, Structure, Code.
Select structure tab -> Click New Data Set -> Select SQL Query as shown like below screenshot:
Step5: Once we clicked 'SQL Query' with the above steps it will open 'Create Data Sets- SQL' window. From that window Select 'OE' in the Data Source and Click 'Query Builder
Step6: Query Builder screen is appearing now and it is showing the 'OE' schema objects in the left pane of that screen.
Drag DEPARTMENTS and EMPLOYEES to the Model space in the right side pane and make a join between those tables by clicking the empty box which is available beside DEPARTMENT_ID column in the department table and clicking empty box available beside DEPARTMENT_ID column in the EMPOYEES Tables.
Join Condition: DEPARTMENTS.DEPARTMENT_ID = EMPLOYEES.DEPARTMENT_ID
Once we selected the empty box beside both column it will change to light grey and Join is created between those tables.
Step7: Select the following columns from the tables (by selecting
the check boxes beside the column names):
-Select DEPARTMENT_NAME from the DEPARTMENTS table
-Select FIRST_NAME, LAST_NAME, HIRE_DATE, and SALARY columns from the EMPLOYEES table. Below screen is showing how to select all the columns from this two tables.
-Select FIRST_NAME, LAST_NAME, HIRE_DATE, and SALARY columns from the EMPLOYEES table. Below screen is showing how to select all the columns from this two tables.
Step8: Now come to the Conditions tab. We can see the only selected Columns. Change the columns in the Alias and als type "IN (:P_DNAME) in the Condition field for the department name column, as shown in the screen below . This will define a parameter P_DNAME on the department name column.
Note: The IN condition is being used here for the parameter to accept All or Multiple values for the department name column.The aliases and display names can be changed in the Data Model page, either in the Diagram or in the Structure too:
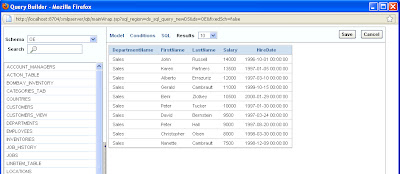
Step9: Click on the SQL tab. It will show the SQL query and /click on Results to see the result for the query.
Step10: Click Save and This will prompt you to enter a department name for the parameter, enter Sales and click OK.
Step11: Now we are coming back to 'Create Data Set - SQL' screen. We can see the window filled by SQL Query for the column which we have selected in the Query Builder and Click 'OK' with the below screen.
Step12: Once we clicked 'OK' with the above screen we will be asked for bind parameter screen. click 'OK' with the screen.
Once we clicked 'OK' and It will give us the 'Info'. click 'OK'.
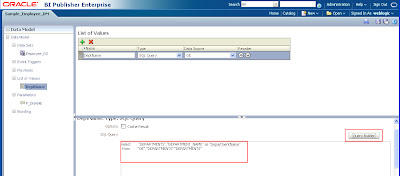
Step13: Now we can see the Data Model Screen with Employee_DS data set and p_DNAME parameter. From the window select List of Values and click '+' symbol from right side pan to create New value.
Name: DeptName
Type: SQL Query
Data Source: OE
Click 'Query Builder' and select only department name from department table form the OE schema query builder and click 'Save'
Step14: Now come to Parameters settings in Data Model.
Now we can the set the properties of P_DNAME parameter to use this LOV.
Verify the following has been entered in the box and selected. If it is not , enter the value as mentioned and select the properties as we seen in the below screenshot:
Name: P_DNAME
Data Type: String
Default Vaulue: * (The character Star) The aim is to give all the of this parameter
Paramter Type: Menu
The following this has be selected into the parameter window:
List of Values: DeptName (This is what we have created in List of Values in Data Model)
and Multiple Selection, Can select all, and All Values Passed options are selected. This options are enabling us to select all or multiple values from Department Name Parameter and Save the Data Model.
Step15: Now we are going to create Employee Name by concatenating Employee First Name and Last Name in the Emloyee_DS Data set. so Edit the Employee_DS Dataset the change the SQL Query like same shown in the below screen shot:
After that save the Data Model.
Step16: With the above step we are coming to end of creating a Data Model. Now we will see the XML output of the Data Model and we will upload the same to the sample data. (In 10g we will download the data model as xml file and we will upload the same into sample data But in 11g we can do all this work in here itself.)
Now click 'XML' option which is available near to Save Button.
Once we clicked 'XML' option with the above screen, we are coming to the below screen. From this window 'Sales' from Department Dropdown and select '10' rows in the 'Number of rows to Return' and click 'Run' Button. Now select 'Save as Sample Data' and it will be saved into sample.xml file with the above screen. Now if we are clicking on sample.xml file we can see the first ten rows of sales department.
So With this step we are completing the creation of Data Model. In the Next step We will know How to create a Report using this Data Model.
Cheers!
Bose


I use JDBC connection to create data model that use very complex sql. while save SQL QUERY that contains lot of parameters, happened error to sql validation.
ReplyDeleteI check the Nqquery.log in order to track the sql,but there is not sql used JDBC connection in Nqquery.log. do you know how to track the sql used JDBC connection?
HI
ReplyDeletewhen I saving data model its taking lot of time,I checked the sql and it does not contain any syntex error.
Could you pls suggest why its taking too much time in saving sql query
There is so much in this article that I would never have thought of on my own. Your content gives readers things to think about in an interesting way. Thank you for your clear information. kündigen
ReplyDelete