Search This Blog

Sunday, 6 December 2020

Oracle Analytics Server Step by Step Installation in Windows | OAS 5.5 Installation in Windows

Surprisingly Oracle has released OAS for windows and I gave a try to install OAS 5.5 in windows to check out the look and features. This post has the steps how I have installed OAS 5.5 in windows.

Prerequisite:

1. Java JDK1.8 221 or Above. (Step by Step installation of Java)

2. Oracle Database 11g Release 2 and above. (Step by step Installation of Oracle DB 12c)

3. I would highly recommend to have minimum of 16 GB Memory and 50GB Disk Space to Install in your windows machine.

OAS 5.5 has 4 Major stages of Installation in Windows

1. Oracle Fusion Middleware Installation

2. OAS Platform Installation

3. RCU (Repository Creation Utility) 

4. OAS Configuration

Note: Interim FMW Patch is only for Linux and not required for Windows. 

Download the OAS 5.5 software's files and extract it in a folder.

Download Link: 

https://www.oracle.com/solutions/business-analytics/analytics-server/analytics-server.html
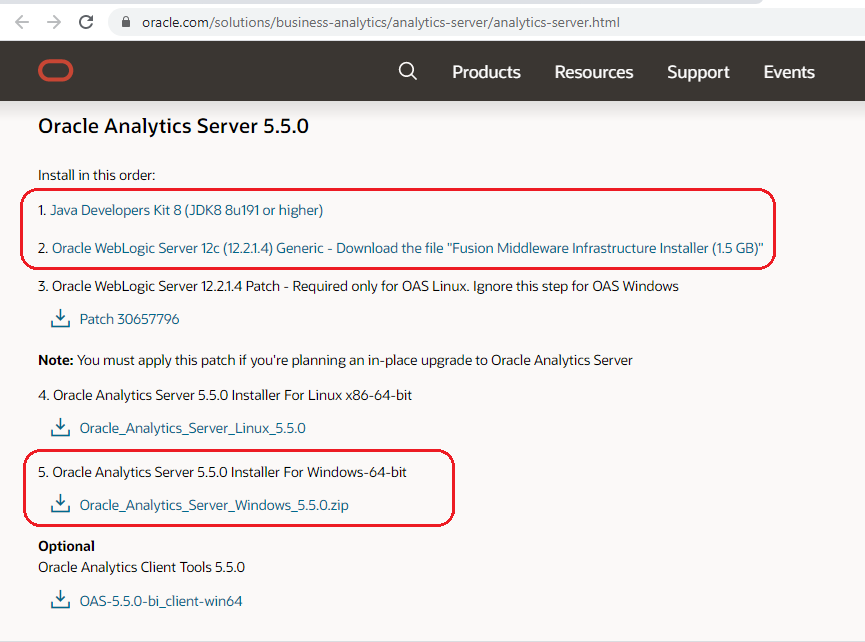
Check if JAVA_HOME and ORACLE_HOME  variable are set in Environment variable. If it is not set, then Create the environment variable.

example: 

JAVA_HOME=C:\Program Files\Java\jre1.8.0_271

ORACLE_HOME=C:\oracle\app\oracle\product\11.2.0\db_1

Step1: Oracle Fusion Middleware Installation

Open the Command Prompt with 'Run as administrator' and go to JAVA bin location to start the fusion middleware installation. The whole OAS installation going to be done in command prompt with the same manner.

cd C:\Program Files\Java\jre1.8.0_271\bin

C:\Program Files\Java\jre1.8.0_271\bin> java -jar D:\OAS\fmw_12.2.1.4.0_infrastructure.jar

It will check the prerequisite and starts the installation. Just click 'Next' with the below screen.
Select the installation directory where you want to install OAS.


Just keep the default selection 'Fusion Middleware Infrastructure' and Click 'Next'
Now the installer checks the system certification and java version. Just click 'Next'
With this step, I have saved the response file for silent installation. If you don't want, then just click 'Install' to start the installation of OAS FMW.
Just click 'Install'.
Save response file if you would like to use it later for silent installation in another environment.

OAS FMW installation is in progress....
If all the steps are successful, it will complete with 100%. Just click 'Next' Here
We have come to the last step of OAS FMW installation. Just click 'Finish' the complete the installation.

2. OAS Platform Installation

Go to Java bin directory and execute the OAS Platform JAR file with the below command from command prompt.

cd C:\Program Files\Java\jdk1.8.0_271\bin

C:\Program Files\Java\jdk1.8.0_271\bin> java -jar D:\OAS\oa_platform-5.5.0.0.0-20200829051051-win64.jar

It will take a while as the jar file is huge and will start the install window.

Just Click 'Next' with the first step

Leave with default selection 'Skip Auto Updates' and click 'Next'
In this step, select your Oracle Home from your fusion middleware directory and click 'Next'. Here I created my own directory OAS55 in D drive and selected that directory.


It will check the prerequisite. Just click 'Next'
With the below step, Save response file if you would like to use it for silent installation in any other system. otherwise just click 'Install'


Installation is in progress......
If it prompts for MS Visual package, just click Allow and close once it is completed.
OAS Platform installation is completed successfully with 100%. Click 'Next'
Click 'Finish' with the last step to complete the installation.

Command prompt window after OA Platform installation.

4. RCU (Repository Creation Utility) 

Go to the OAS Middleware common bin directory bi\bin and run command.

cd D:\OAS55\oracle_common\bin

D:\OAS55\oracle_common\bin> rcu.bat

Just click 'Next' with the first step

Go with default selection 'Create Repository' and 'System Load and Product Load' then click 'Next'
Enter all your parameters with step3 below
Host Name: Bose
Port: 1521
Service: ORCLPDB
User Name: Sys
Password: Admin123
Role: SYSDBA

Checking RCU Prerequisites. Just click 'OK' once it is done.
We could name prefix of all the RCU accounts. I have select as DEV as a prefix for all my RCU schemas.
Don't forget to select 'Oracle Business Intelligence' with the below step
Running Prerequisites for all the schemas. Just click 'OK' once it is done.
Type Password that you would like keep for all your RCU Schemas and click 'Next'
It will show all the schema, tablespace and temp tablespace name that is going to be created. Just click 'Next'
Just click 'OK' with the confirmation window.
Creating Tablespaces. Just click "OK' once it is done.
Step 7 is the actual step where it is going to create all the schemas. Click 'Create' with the below step.
Once we clicked 'Create' with the above step, it will start creating and runs the below window.
Once it is created successfully click 'Close' to complete the RCU Creation.

5. OAS Configuration

In command prompt, Go to fusion middleware bi/bin directory to run the OAS configuration.
cd D:OAS55\bi\bin
D:OAS55\bi\bin>config.cmd


Just click 'Next' with the first step of OAS Configuration.
With the second step, we could keep BI Publisher if we want with our installation otherwise we could uncheck it. I have selected both and clicked 'Next'
It run the system prerequisite check. Just click 'Next'
With the step4, It will select the domain directory by default. If we want to change, we could click 'Browse' and can change the directory.
Type the weblogic password and confirm password with this step.
In Step5, select 'Use existing Schemas' as we have already created all the RCU schemas and enter the details.
Database Type: Oracle
Simple connection String: Bose:1521:ORCLPDB ( HostName:Port:Service)
Prefix: DEV
Password: Admin123
After all the details entered, click 'Next'


in Step6, It would select the port range. we could change based on our criteria. I just left with the default port selection and clicked 'Next'
with step7, we could select the first option to install with sample application. I have selected second option since I want clean installation and clicked 'Next'
with Step8, we could save response file for future use. and click 'Configure' to start OAS configuration.


with step9, OAS Configuration will progress. It takes a while to complete the everything. We are good if it is completed 100%
Completed 100% successfully with the configuration.

Once it is completed successfully then click 'Next' with the above step to come to last step.

Save the log file with the last step which will have all the analytics, em, console URL and other details then click 'Finish' to complete the OAS Configuration.

EM:


Console:

Analytics:

Hurray!!!! We have successfully installed OAS 5.5 in windows with the above step. Check OAS Analytics, EM and all the components and Enjoy :)

Cheers! Bose

Friday, 4 December 2020

Exporting and Importing BAR file OBIEE 12.2.1.4.x

We have an utility to export OBIEE Catalog, RPD, security model and all other relevant objects to be exported into a .bar file and the same could be imported if we have to migrate to any other environment or as a backup. Please follow the below steps for the same.

Upto 12.2.1.3, We have export_service_instance and import_service_instance command but 12.2.1.4 those commands are deprecated and introduced exportarchive and importarchive.

Exporting BAR File in OBIEE 12c:

 ***********************************************************

1. Make sure that the below environment variables are set:

BI_PRODUCT_HOME=$ORACLE_HOME/bi
ORACLE_HOME=/obiee12c (where OBIEE installed)
DOMAIN_HOME=/obiee12c/user_projects/domains (Where domain is located)

2. Run the below command with exportarchive.sh

Syntax:

[DOMAIN_HOME]/bitools/bin/exportarchive.sh ssi <Bar file name>.bar encryptionpassword=<password>

Example:

[DOMAIN_HOME]/bitools/bin/exporarchive.sh ssi /obiee12c/backup/obitest.bar encryptionpassword='Admin123'

Note: 

Encryption password is optional. If you are chosen with password, you have to use the same while importing

Importing BAR File in OBIEE 12c:

 ***********************************************************

The import_bar.sh |. cmd command is deprecated in OBI 12.2.1.4. 

With 12.2.1.4, use the importarchive.sh (Linux) | importarchive.cmd (for windows) command.

You may use the -h switch for syntax

[DOMAIN_HOME]/bi/bitools/bin/importarchive.sh -h

USAGE : <service instance key> <location of bar file to import> [nodatamodel] [nocontent] [noauthorization] [nodatasets] [nosearch] [noaction] [encryptionpassword=<encryption password for connections>]
 Description         : Import bar as a service instance
 Mandatory Arguments : service instance key and location of bar file
 Optional Arguments  : exclude list of values:nodatamodel nocontent                        noauthorization nodatasets nosearch
  nodatamodel        : Do not import RPD metadata content
  nocontent          : Do not import WEBCAT metadata content
  noauthorization    : Do not import JAZN metadata content
  nodatasets         : Do not import DSS metadata content
  nosearch           : Do not import Search metadata content
  noaction           : Do not import Action metadata content
  encryptionpassword : Encryption password for connections if any 

Syntax:

./importarchive.sh ssi /obiee12c/backup/obitest.bar                  encryptionpassword=<password>                                        

Example:                                                            ./importarchive.sh ssi /obiee12c/backup/obitest.bar encryptionpassword=Admin123

Cheers!

Bose

Sunday, 25 October 2020

AWS RDS Oracle Frequently used SQL Queries

 Recently I came across working on Amazon Oracle RDS database where I have to migrate the in-place oracle database to Amazon RDS. Here is my learning from that implementation of frequently used queries in Oracle / Amazon RDS.

1. Getting all the tablespace file from database

    select tablespace_name, bytes from dba_data_files;

2. Getting long running job status from database

    SELECT SID, SERIAL#, OPNAME, CONTEXT, SOFAR, 

    TOTALWORK,ROUND(SOFAR/TOTALWORK*100,2) "%_COMPLETE" 

    FROM V$SESSION_LONGOPS 

    WHERE OPNAME NOT LIKE '%aggregate%' 

    AND TOTALWORK != 0 

    AND SOFAR <> TOTALWORK;

 3. How to get all the files from a directory?

select * from table (rdsadmin.rds_file_util.listdir(p_directory => 'DATA_PUMP_DIR'));

4. Getting details from import Log files          

    select * from table (rdsadmin.rds_file_util.read_text_file(

       p_directory => 'DATA_PUMP_DIR',

        p_filename  => 'abc.log'));

5. Removing a file from a directory

    exec utl_file.fremove('DATA_PUMP_DIR','IMPORT.LOG');

6. How to kill a job in RDS Oracle

begin

rdsadmin.rdsadmin_util.kill(sid => sid, serial => serial_number);

end;

/

7. Providing Grant issues

    GRANT EXEMPT ACCESS POLICY TO "SYSTEM"

    GRANT GRANT ANY ROLE TO "SYSTEM" with admin option; 

    GRANT DEBUG ANY PROCEDURE TO "HR"

    GRANT CREATE VIEW TO "HR"

7. Granting Permissions to SYS Objects in AWS RDS

begin

rdsadmin.rdsadmin_util.grant_sys_object(p_obj_name => 'V_$SESSION',p_grantee => 'HR',p_privilege => 'SELECT');

end;

/

8. Exporting a Schema from a database in AWS RDS / Oracle

================================================================

DECLARE

hdnl NUMBER;

BEGIN

hdnl := DBMS_DATAPUMP.OPEN( operation => 'EXPORT', job_mode => 'SCHEMA', job_name=>null);

DBMS_DATAPUMP.ADD_FILE( handle => hdnl, filename => 'ABC.dmp', directory => 'DATA_PUMP_DIR', filetype => dbms_datapump.ku$_file_type_dump_file);

DBMS_DATAPUMP.ADD_FILE( handle => hdnl, filename => 'ABC.log', directory => 'DATA_PUMP_DIR', filetype => dbms_datapump.ku$_file_type_log_file);

DBMS_DATAPUMP.METADATA_FILTER(hdnl,'SCHEMA_EXPR','IN (''ABC'')');

DBMS_DATAPUMP.START_JOB(hdnl);

END;

/

================================================================

9. Getting number of tables from a database

select count(*) from all_objects where object_type = 'TABLE';

10. How to drop a AQ Tables:

EXEC dbms_aqadm.drop_queue_table ( queue_table => 'HR.AQ$_HR_EMP_SQ_I',force=>true);


11. How to copy dump files from s3 bucket to database

SELECT rdsadmin.rdsadmin_s3_tasks.download_from_s3(
p_bucket_name    =>  'mys3bucketname', 
p_s3_prefix      =>  'db', 
p_directory_name =>  'DATA_PUMP_DIR') 
AS TASK_ID FROM DUAL;   

12. How to get the query of any view or table from a schema:

syntax:
select dbms_metadata.get_ddl('object_type','object_name','schema nme') from dual;
e.g:
select dbms_metadata.get_ddl('VIEW','EMPLOYEE','HR') from dual;

13. How to know when is an object created
syntax:
SELECT created FROM dba_objects  WHERE object_name = 'object_name'     AND owner =     'schema_name' AND object_type = 'object_type';

e.g:
SELECT created   FROM dba_objects  WHERE object_name =                'EMPLOYEE' AND owner =     'APPS' AND object_type = 'VIEW';

14. checking data dumping directory to check the dump files

     select * from                 
   table(RDSADMIN.RDS_FILE_UTIL.LISTDIR('DATA_PUMP_DIR')) order          by mtime;  

15. Creating Tablespaces

    create tablespace TEMP1 datafile size 5G autoextend on maxsize 10G;

16. creating a database in Oracle or Amazon RDS database

Sample Syntax:

create user schema_1 identified by <password>;

grant create session, resource to schema_1;

alter user schema_1 quota 100M on users;

Example:

CREATE USER HR IDENTIFIED BY HR

DEFAULT TABLESPACE USERS

TEMPORARY TABLESPACE TEMP

QUOTA UNLIMITED ON USERS;

GRANT CREATE SESSION, CREATE TABLE to HR;

17. Importing Dump file in Amazon RDS

Now we could start running the import process with the following command:

================================================================

DECLARE

hdnl NUMBER;

BEGIN

hdnl := DBMS_DATAPUMP.OPEN( operation => 'IMPORT', job_mode =>        'SCHEMA',job_name=>null);

DBMS_DATAPUMP.ADD_FILE( handle => hdnl, filename => 'HR.dmp',        directory => 'DATA_PUMP_DIR', filetype => dbms_datapump.ku$_file_type_dump_file);

DBMS_DATAPUMP.ADD_FILE( handle => hdnl, filename =>       'HR.log', directory => 'DATA_PUMP_DIR', filetype =>       dbms_datapump.ku$_file_type_log_file);

DBMS_DATAPUMP.METADATA_FILTER(hdnl,'SCHEMA_EXPR','IN (''HR'')');

DBMS_DATAPUMP.START_JOB(hdnl);

 END;

 /

================================================================

18. How to copy your dump files to S3 bucket from Linux Server

syntax: 
aws s3 cp /data/dumps/HR.dmp s3://s3-bucket-name

Wednesday, 21 October 2020

Log files Location/directory in OBIEE 12c / OAS

OBIEE 12c Log Locations:

First We should know our fusion middleware home or oracle BI Home directory location and then search in the relevant folder/directory for logs.

  • AdminServer logs – <FMW_HOME>/user_projects/domains/bi/servers/AdminServer/logs
  • bi_server1 logs – <FMW_HOME>/user_projects/domains/bi/servers/bi_server1/logs
  • Presentation Server logs – <FMW_HOME>/user_projects/domains/bi/servers/obips1/logs
  • JavaHost logs – <FMW_HOME>/user_projects/domains/bi/servers/obijh1/logs
  • Cluster Components logs – <FMW_HOME>/user_projects/domains/bi/servers/obiccs1/logs
  • Scheduler Server logs – <FMW_HOME>/user_projects/domains/bi/servers/obisch1/logs

If it is 2 Node Servers, then 

Presentation Server logs 2nd Node – <FMW_HOME>/user_projects/domains/bi/servers/obips2/logs

Scheduler Server logs For 2nd Node– <FMW_HOME>/user_projects/domains/bi/servers/obisch2/logs

OBIEE 11g Locations:

  • Upgrade logs – Middleware\Oracle_BI1\upgrade\logs
  • Admin Server logs – <FMW_HOME>\user_projects\domains\bifoundation_domain\servers\AdminServer\logs
  • Managed Server logs – <FMW_HOME>\user_projects\domains\bifoundation_domain\servers\bi_server1\logs
  • BI Server logs – <FMW_HOME>\instances\instance1\diagnostics\logs\OracleBIServerComponent\coreapplication_obis1
  • Presentation Server logs – <FMW_HOME>\instances\instance1\diagnostics\logs\OracleBIPresentationServicesComponent\coreapplication_obips1


Cheers!

Bose

What is Oracle Database Link and How to create database link (DB Link)

 https://www.oracletutorial.com/oracle-administration/oracle-create-database-link/

Recent Posts