Search This Blog

Tuesday, 1 May 2018

Oracle Database 12.1.0.2.0 Step by Step Silent installation

 Introduction

This post, I am sharing on how to install Oracle Database 12c in silent installation. I went through lot of Posts and blogs and sharing how to simplify and have smooth database installation. This includes post installation steps where we would have little struggle in create listener.ora and tnsnames.ora and How to create and start pluggable database automatically. This installation is done in Redhat Linux 7.

Installation follows below steps

                1. Prerequisites

                2. Oracle DB Installation

                3. Oracle DB Configuration

                4. Listener.ora & tnsnames.ora File setup

1. Prerequisites 

Adding IP and Hostname Hosts File

Edit "/etc/hosts" file  and add your IP Address and hostname as shown in the example.

<IP-address>  <fully-qualified-machine-name>  <machine-name>

For example.

$ vi /etc/hosts

127.0.0.1       localhost localhost.localdomain localhost4 localhost4.localdomain4
10.20.30.40     bose_pc    bose_pc 


Set the correct hostname in the "/etc/hostname" file.

biapp

 Oracle Installation Prerequisites

Perform either the Automatic Setup or the Manual Setup to complete the basic prerequisites. The Additional Setup is required for all installations.

Automatic Setup

If you plan to use the "oracle-database-server-12cR2-preinstall" package to perform all your prerequisite setup, issue the following command.

# yum install oracle-database-server-12cR2-preinstall -y

It is probably worth doing a full update as well, but this is not strictly speaking necessary.

# yum update -y

 It's worth running the all the YUM commands listed in the manual setup section. Depending on the OS package groups you have selected, some additional packages might also be needed.

Manual Setup

If you have not used the "oracle-database-server-12cR2-preinstall" package to perform all prerequisites, you will need to manually perform the following setup tasks.

Add the following lines to the "/etc/sysctl.conf" file, or in a file called "/etc/sysctl.d/98-oracle.conf".

fs.file-max = 6815744
kernel.sem = 250 32000 100 128
kernel.shmmni = 4096
kernel.shmall = 1073741824
kernel.shmmax = 4398046511104
kernel.panic_on_oops = 1
net.core.rmem_default = 262144
net.core.rmem_max = 4194304
net.core.wmem_default = 262144
net.core.wmem_max = 1048576
net.ipv4.conf.all.rp_filter = 2
net.ipv4.conf.default.rp_filter = 2
fs.aio-max-nr = 1048576
net.ipv4.ip_local_port_range = 9000 65500


Run one of the following commands to change the current kernel parameters, depending on which file you edited.

/sbin/sysctl -p
# Or
/sbin/sysctl -p /etc/sysctl.d/98-oracle.conf

Add the following lines to a file called "/etc/security/limits.d/oracle-database-server-12cR2-preinstall.conf" file.

oracle   soft   nofile    1024
oracle   hard   nofile    65536
oracle   soft   nproc    16384
oracle   hard   nproc    16384
oracle   soft   stack    10240
oracle   hard   stack    32768
oracle   hard   memlock    134217728
oracle   soft   memlock    134217728


For RHEL OL6 or OL7

# OL6 and OL7 (RHEL6 and RHEL7)
yum install binutils -y
yum install compat-libcap1 -y
yum install compat-libstdc++-33 -y
yum install compat-libstdc++-33.i686 -y
yum install glibc -y
yum install glibc.i686 -y
yum install glibc-devel -y
yum install glibc-devel.i686 -y
yum install ksh -y
yum install libaio -y
yum install libaio.i686 -y
yum install libaio-devel -y
yum install libaio-devel.i686 -y
yum install libX11 -y
yum install libX11.i686 -y
yum install libXau -y
yum install libXau.i686 -y
yum install libXi -y
yum install libXi.i686 -y
yum install libXtst -y
yum install libXtst.i686 -y
yum install libgcc -y
yum install libgcc.i686 -y
yum install libstdc++ -y
yum install libstdc++.i686 -y
yum install libstdc++-devel -y
yum install libstdc++-devel.i686 -y
yum install libxcb -y
yum install libxcb.i686 -y
yum install make -y
yum install nfs-utils -y
yum install net-tools -y
yum install smartmontools -y
yum install sysstat -y
yum install unixODBC -y
yum install unixODBC-devel -y
 
# Required for 12.1, not listed for 12.2
yum install gcc -y
yum install gcc-c++ -y
yum install libXext -y
yum install libXext.i686 -y
yum install zlib-devel -y
yum install zlib-devel.i686 -y
 
# OL6 only (RHEL6 only)
yum install e2fsprogs -y
yum install e2fsprogs-libs -y
yum install libs -y
yum install libxcb.i686 -y
yum install libxcb -y

Create the new groups and users.

groupadd -g 54321 oinstall
groupadd -g 54322 dba
groupadd -g 54323 oper
#groupadd -g 54324 backupdba
#groupadd -g 54325 dgdba
#groupadd -g 54326 kmdba
#groupadd -g 54327 asmdba
#groupadd -g 54328 asmoper
#groupadd -g 54329 asmadmin
#groupadd -g 54330 racdba
 
useradd -u 54321 -g oinstall -G dba,oper oracle

Uncomment the extra groups you require.

Additional Setup

The following steps must be performed, whether you did the manual or automatic setup.

Set the password for the "oracle" user.

passwd oracle

Set secure Linux to permissive by editing the "/etc/selinux/config" file, making sure the SELINUX flag is set as follows.

SELINUX=permissive

Once the change is complete, restart the server or run the following command.

# setenforce Permissive

If you have the Linux firewall enabled, you will need to disable or configure it, as shown here or here. To disable it, do the following.

# systemctl stop firewalld
# systemctl disable firewalld

If you are not using Oracle Linux and UEK, you will need to manually disable transparent huge pages.

Create the directories in which the Oracle software will be installed.

mkdir -p /app/oracle/product/12.1.0.2/dbhome_1
chown -R oracle:oinstall /u01
chmod -R 775 /u01


Putting mount points directly under root without mounting separate disks to them is typically a bad idea. It's done here for simplicity, but for a real installation "/" storage should be reserved for the OS.

Unless you are working from the console, or using SSH tunneling, login as root and issue the following command.

xhost +bose_pc

 2. Oracle DB Installation

Download Oracle Database12.1.0.2 and unzip the software in server and start the installation with the following command in putty or terminal. 

Just click this link to get db_install.rsp file details. copy the content and save as db_install.rsp and move to your intallation directory

$ cd /u01/stage/softwares/database/database

$ ./runInstaller -ignoreSysPrereqs -ignorePrereq -showProgress -silent -responseFile  /u01/stage/softwares/database/database/response/db_install.rsp INVENTORY_LOCATION=/u01/app/oraInventory ORACLE_HOME=/u01/app/oracle/product/12.1.0.2/dbhome_1 ORACLE_BASE=/u01/app/oracle


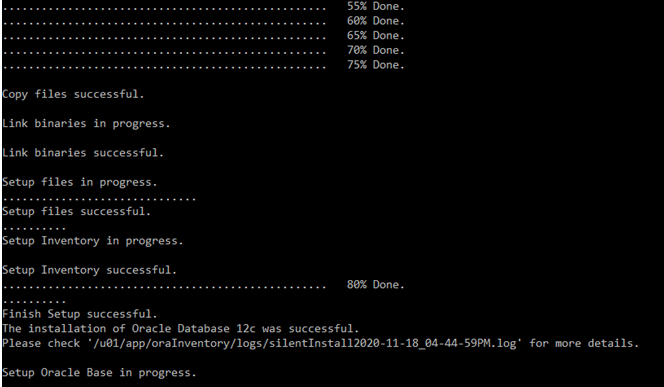
It will start the installation and will send successfully without configuring the DB.

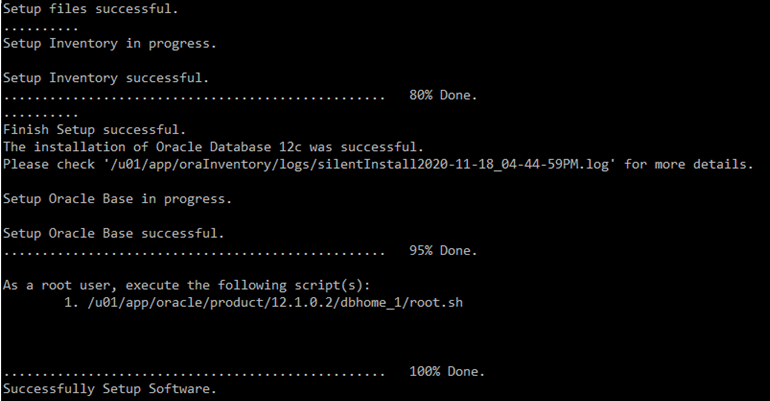
As shown in the screenshot, Login as root user and run root.sh file.

 3. Oracle DB Configuration:

Next step is configuring the DB. To configure get the dbca.rsp from this link. Copy the content from the post and save as dbca.rsp and move to installation diretory.

After that run the below command to initiate the DB configuration.

$ cd /u01/app/oracle/product/12.1.0.2/dbhome_1/bin

$ dbca -silent -createDatabase -responseFile /u01/stage/softwares/database/database/response/dbca.rsp


Oracle 12c has been installed successfully. To check run lsnrctl status command from linux to check the listener status.

4. Listener.ora & tnsnames.ora File setup

create tnsnames.ora and listener.ora file in the following directory. /u01/app/oracle/product/12.1.0.2/dbhome_1/network/admin/

tnsnames.ora

ORCL =
  (DESCRIPTION =
    (ADDRESS = (PROTOCOL = TCP)(HOST = bose-pc)(PORT = 1521))
    (CONNECT_DATA =
      (SERVER = DEDICATED) (INSTANCE_NAME=ORCL)
      (SERVICE_NAME = ORCL)
    )
  )
PDBDB =
  (DESCRIPTION =
    (ADDRESS = (PROTOCOL = TCP)(HOST = bose-pc)(PORT = 1521))
    (CONNECT_DATA =
      (SERVER = DEDICATED)
      (SERVICE_NAME = PDBDB)
    )
  )

listener.ora

ORCL =(DESCRIPTION_LIST =
  (DESCRIPTION =
   (ADDRESS = (PROTOCOL = TCP)(HOST = biapp)(PORT = 1521))
  ))
 SID_LIST_LISTENER =
 (SID_LIST =
  (SID_DESC =
   (GLOBAL_DBNAME = BIAPPDB)
   (SID_NAME = ORCL)
   (ORACLE_HOME = /u01/app/oracle/product/12.1.0.2/dbhome_1)
  )
  )

Happy Blogging!

Bose

Wednesday, 31 January 2018

Split and Join Large files on Linux

When we are having a very large file or directory to be copied or transferred from one place to another, It would be good practice to create a tar file first and then split the tar into small pieces of tar which could be easily copied or transferred and then merged back as a single file in the target environment.

 First, we must compress the file with tar archiver.

Syntax: $ tar -cvzf <archive-name>.tar.gz <source_file>

example: tar -cvzf test.tar.gz /home/obiee12c/catalog

To Split:

This command file archive our folder to *.tar.gz. We can use file instead of path to folder for the argument. Then we will split up our file archive into small parts.

Syntax: $ split -b 1024M <archive-name>.tar.gz “parts-prefix”

example: $ Split -b 1024M test.tar.gz test.tar.part

-b 1024M will split the file into 1 Gigabytes size of file. The “part-prefix” will give the prefix name of our parts of file.

To Merge/Join this file, we can use cat command.

$ cat test.tar.part* > test.tar.gz

Cheers! Bose

Thursday, 4 January 2018

OBIEE RPD Merge using XML Patch - How to generate and Merge RPD XML Patch

There is a simple method where you could compare the master RPD and latest RPD and You could generate a XML file which could have all your changes and that could be easily merged or migrated to another environment RPD.

Here is the steps for the same. First We will see how to Prepare the XML file and then next , We will see how to merge the same. 

Need OBIEE 12c Samplesales RPD, Just Click Here. RPD Password: Admin123

How to generate a XML patch using the Administration Tool:

Step 1:  

In the Administration Tool, Open the latest RPD in offline mode. In other words, open the updated repository that contains the changes you want to put in the patch.

Step 2: 

In the Administration Tool, Select File then select Compare.

Step 3: 

Select the Master or Original repository. Select Repository from the submenu to select a binary repository file in RPD format, 

or select XML to select a set of MDS XML documents.

Step 4: 

In the Open Offline dialog, enter the repository password and click OK.

Step 5a(optional): It is a good practice to equalize your changes to clean up underlying object IDs before generating a patch.

Step 5b: In the Compare repositories dialog, review the changes between the repositories. Then, click Create Patch. In the Create Patch dialog, 

enter a name for the patch file (for example, my_patch.xml) 

and click Save.

How To Merge the XML in the Target RPD:

Step 1:In the Administration Tool, open the modified Oracle BI repository in offline mode. In i.e., open the repository on which you want to apply the patch.

Step 2:Select File, then select Merge. The Merge Repository Wizard appears.  For Merge Type, select Patch Repository Merge.

Step 3: Select the original parent repository by clicking Select next to Original Master Repository. 

Select Repository from the submenu to select a binary repository file in RPD format, or select XML to select a set of MDS XML documents.

Step 4:Enter the repository password for the original repository.

Step 5: Click Select next to Patch File. Browse to select the patch file you want to apply, 

then click Open. The patch file must be in XML format. Please make sure patch file password is the same as the password for the current repository.

Step 6: Click Finish.


Cheers!

Bose

Thursday, 14 December 2017

How to read cwallet.sso file

I often tried to open cwallet.sso file to see the content. Here is the steps How could we read the cwallet.sso file in OBIEE 12c.

Go the Oracle Common bin directory and we will have orapki command file. 

Syntax:

$MW_HOME/oracle_common/bin/orapki wallet display -wallet /obiee12c/stage/cwallet.sso

Example:

[oracle@bidev bin]$ ./orapki wallet display -wallet $MW_HOME/domains/bi/config/fmwconfig/bootstrap/cwallet.sso

Oracle PKI Tool : Version 12.1.1.7.0
Copyright (c) 2004, 2013, Oracle and/or its affiliates. All rights reserved.

Requested Certificates:

User Certificates:
Oracle Secret Store entries:
BOOTSTRAP_JPS@#3#@bootstrap_9m1kYn8KpxCStfqBmSxQFhIadffHs=
fks@#3#@current.key
fks@#3#@master.key.0
fks@#3#@master.key.0.base64
IntegrityChecker@#3#@kss
Trusted Certificates:
Subject:        OU=Class 2 Public Primary Certification Authority,O=Symantec\, Inc.,C=US
Subject:        OU=Class 3 Public Primary Certification Authority,O=
Symantec\, Inc.,C=US
Subject:        CN=GTE CyberTrust Global Root,OU=
Symantec Solutions\, Inc.,O=GTE Corporation,C=US
Subject:        OU=Class 1 Public Primary Certification Authority,O=
Symantec\, Inc.,C=US

Friday, 5 May 2017

How to get OS Version and other server related deails in Linux

 After opening a command or Putty terminal in Linux Try with the following commands to know the details.


1. To know the OS Version Details:

[pcs_user@root]$ cat /etc/os-release


Output:
NAME="CentOS Linux"
VERSION="7 (Core)"
ID="centos"
ID_LIKE="rhel fedora"
VERSION_ID="7"
PRETTY_NAME="CentOS Linux 7 (Core)"
ANSI_COLOR="0;31"
CPE_NAME="cpe:/o:centos:centos:7"
HOME_URL="https://www.centos.org/"
BUG_REPORT_URL="https://bugs.centos.org/"

CENTOS_MANTISBT_PROJECT="CentOS-7"
CENTOS_MANTISBT_PROJECT_VERSION="7"
REDHAT_SUPPORT_PRODUCT="centos"
REDHAT_SUPPORT_PRODUCT_VERSION="7"

2.  lsb_release command 
There is a lsb_release gives LSB(Linux Standard Base) and distribution specific info. on the CLI.

[pcs_user@root]$ lsb_release -a


Output:
LSB Version:    :core-4.1-amd64:core-4.1-noarch
Distributor ID: CentOS
Description:    CentOS Linux release 7.6.1810 (Core)
Release:        7.6.1810
Codename:       Core

3. hostnamectl command

Use hostnamectl command to query and change the system hostname and related settings. Just type the following command to check OS name and Linux kernel version:

[pcs_user@root]$ hostnamectl

Output:
   Static hostname: DevServer.BI.Oracle.com
         Icon name: computer-vm
           Chassis: vm
        Machine ID: b30d0f2110a0c19ede3ce23488f
           Boot ID: b7b17e68ac544a72340dfafec4ba
    Virtualization: kvm
  Operating System: CentOS Linux 7 (Core)
       CPE OS Name: cpe:/o:centos:centos:7
            Kernel: Linux 3.10.0-957.1.3.el7.x86_64
      Architecture: x86-64


4. To Know the Kernel version
[pcs_user@root]$ uname -r


Output:
3.10.0-957.1.3.el7.x86_64

Cheers!
Bose

Wednesday, 3 May 2017

How To create a Swap file in Linux

Once you connected to Linux terminal or putty, with the following steps we can create a swap file.

We need to have the root or sudo privileges to do the same.

To add a swap file:
  1. Determine the size of the new swap file in megabytes and multiply by 1024 to determine the number of blocks. For example, the block size of a 64 MB swap file is 65536. (64*1024)
          Mention appropriate count to get correct size of your swap file.
  1. At a shell prompt as root, type the following command with count being equal to the desired block size:
dd if=/dev/zero of=/swapfile bs=1024 count=65536
  1. Change the permissions of the newly created file:
chmod 0600 /swapfile
  1. Setup the swap file with the command:
mkswap /swapfile
  1. To enable the swap file immediately but not automatically at boot time:
swapon /swapfile
  1. To enable it at boot time, edit /etc/fstab to include the following entry:
/swapfile          swap            swap    defaults        0 0
The next time the system boots, it enables the new swap file.

Cheers!
Bose

Thursday, 14 April 2016

Time Dimension Table Design for Data Warehouse Project withh Sample Data

When we are working with Business Intelligence Projects, It is mandatory to have Time dimension to create lot of measures like Year Ago, Month Ago, Week Ago, Date Ago or Year To Date, MTD, YTD , WTD and much more.

Designing or Creating a Time dimension table with data would be easier task. Here I am making a simpler way to create a Time Dimension which would fit for any requirement with all the relevant columns.

Step1: Create a Time Dimension Table with the below DDL Query

# WC_TIME_D: /* DDL for the date dimension */
*********************************************
CREATE TABLE WC_TIME_D (
DATE_KEY SMALLINT NOT NULL,
FULL_DATE DATE,
DAY_OF_WEEK SMALLINT,
DAY_NUM_IN_MONTH SMALLINT,
DAY_NUM_OVERALL SMALLINT,
DAY_NAME VARCHAR(9),
DAY_ABBREV CHAR(3),
WEEKDAY_FLAG CHAR(1),
WEEK_NUM_IN_YEAR SMALLINT,
WEEK_NUM_OVERALL SMALLINT,
WEEK_BEGIN_DATE DATE,
WEEK_BEGIN_DATE_KEY SMALLINT,
MONTH SMALLINT,
MONTH_NUM_OVERALL SMALLINT,
MONTH_NAME VARCHAR(9),
MONTH_ABBREV CHAR(3),
QUARTER SMALLINT,
YEAR SMALLINT,
YEARMO INT,
FISCAL_MONTH SMALLINT,
FISCAL_QUARTER SMALLINT,
FISCAL_YEAR SMALLINT,
LAST_DAY_IN_MONTH_FLAG CHAR(1),
SAME_DAY_YEAR_AGO_DATE DATE,
PRIMARY KEY (DATE_KEY));

 Step2:Download the excel Sheet which has the prefilled with data of up to Year 2025.

Step3: Generating the Time Data for Years we want

To Get the the value up to the year you want, Just Open the downloaded excel sheet and select the last row of the first sheet and drag it down. It will automatically fill the the value with the prebuilt formula.

Step 4: Inserting Data into Table - There are 2 ways

Way 1: After we have generated the data,  just Copy and "Paste as values" in another sheet and insert from Excel directly to Oracle Database

Way 2: There is insert statement generated in the first sheet (Z column). Just drag up to the value you have created to create insert statement for all rows and then copy paste the query in SQL developer or put as an .sql file and run in DB to load.

Note:

If you face the below error while running insert statement then execute the alter statement and continue the insertion;

SQL Error: ORA-01861: literal does not match format string 01861

Solution:

ALTER SESSION SET NLS_DATE_FORMAT='YYYY-MM-DD'

Do not forget to commit after insert completes.

Cheers!

Bose

What is Oracle Database Link and How to create database link (DB Link)

 https://www.oracletutorial.com/oracle-administration/oracle-create-database-link/

Recent Posts